Nginx 11月6日的安全更新中,修补了三个可导致拒绝服务的漏洞:CVE-2018-16843,CVE-2018-16844和CVE-2018-16845。位于Nginx HTTP/2 模块和流媒体MP4模块。基于Nginx的Tengine也受到了影响,并于2018年11月11日发布更新版本 Tengine-2.2.3 修复了该漏洞。只为了修复漏洞的话可以只看本文「编译升级到Tengine-2.2.3」部分。
关于本次漏洞的相关信息
一共有三个可导致拒绝服务的漏洞,影响绝大部分Nginx版本:
CVE-2018-16843,CVE-2018-16844漏洞存在于ngx_http_v2模块之中(默认情况下不编译,编译时需要开启–with-http_v2_module,同时将listen http2添加到配置文件中),当用户添加http2支持时,攻击者可以发送特制的HTTP/2请求,消耗CPU和内存资源,最终导致DoS。
CVE-2018-16845漏洞存在于ngx_http_mp4_module模块中,当用户对Nginx添加MP4流媒体支持,恶意的MP4文件会导致处理进程无限循环、崩溃或者内存泄露。
总的来说,HTTP/2 漏洞影响 1.9.5 和 1.15.5 之间的所有 nginx 版本,MP4 模块安全问题影响运行 nginx 1.0.7, 1.1.3 及更高版本的服务器。*更多详细信息*
目前宝塔面板内的Tengine还没有更新,依然是v2.2.2版本,所以打算手动编译升级到Tengine-2.2.3,然后竟然打算重新编译升级Tengine的话,打算顺便把TLSv1.3也给弄上,关于为什么宝塔官方没有直接在面板上支持TLSv1.3开启以及升级OpenSSL的影响有如下说明:
关于openssl,你要支持tls1.3就必须用nginx mainline版,而且换成openssl-1.1.0f/g/openssl-1.1.1等版本 那么php7.0以下的Php版本都编译不上 mariadb10.0/10.1编译不上,而我们所做的rpm包用的openssl版本还是1.0.2k的,若要升级至openssl-1.1.1,则要花费大量时间重新编译rpm包,同时还要考虑之前安装过的宝塔的兼容问题。
如果你能给我一套方案让几十万的宝塔使用用户可以完美升级的方案,或者给我找几十万需要Tls1.3的用户的话,我也很乐意去升级的。
作为开发人员,我也很想让面板支持所有新功能/新特性,但1是人手不足,很多东西想弄来不及弄出来,2是新功能就意味着可能会有新的漏洞/BUG,让几十万用户遭受,我们承受不起。*引用自宝塔官方论坛*
因为我那台服务器上没有用到PHP7.0以下的版本,也没有使用mariadb10.0/10.1,所以我打算直接把OpenSSL升级到1.1.1版本并开启TLSv1.3
升级OpenSSL
下载openssl-1.1.1
wget https://www.openssl.org/source/openssl-1.1.1.tar.gz
最新版OpenSSL可以在官网 https://www.openssl.org/source/ 看到。
编译升级OpenSSL
tar -xvf openssl-1.1.1.tar.gz
rm -f openssl-1.1.1.tar.gz
cd openssl-1.1.1
./config --prefix=/usr shared zlib-dynamic
rm -f /usr/include/openssl
make && make install
ln -sf /usr/include/openssl/*.h /usr/include/
ln -sf /usr/lib64/openssl/engines/*.so /usr/lib/
ldconfig -v
echo -e "openssl_installed" >> /www/server/lib.pl
注意: ln -sf /usr/lib64/openssl/engines/*.so /usr/lib/ 这一步,可能因为宝塔版本原因,OpenSSL的位置可能不同,例如可能位于 /usr/lib/openssl/engines/ ,通过 find / -name openssl 命令可以查看位置:
[root@ggc ~]# find / -name openssl
/usr/local/openssl
/usr/local/openssl/include/openssl
/usr/local/openssl/bin/openssl
/usr/share/doc/openssl
/usr/lib64/openssl
/usr/lib64/python2.7/site-packages/cryptography/hazmat/bindings/openssl
/usr/lib64/python2.7/site-packages/cryptography/hazmat/backends/openssl
/usr/include/openssl
/usr/bin/openssl
/root/tengine-2.2.3/auto/lib/openssl
/root/openssl-1.1.1/test/ossl_shim/include/openssl
/root/openssl-1.1.1/include/openssl
/root/openssl-1.1.1/apps/openssl
/www/server/php/72/src/ext/openssl
/www/server/nginx/src/auto/lib/openssl
/www/server/nginx/src/openssl
/etc/pki/ca-trust/extracted/openssl
升级完过后查看一下OpenSSL版本是否正确
openssl version
升级curl
添加一个新的repo
vim /etc/yum.repos.d/city-fan.repo
在里面添加内容:
[CityFan]
name=City Fan Repo
baseurl=http://www.city-fan.org/ftp/contrib/yum-repo/rhel$releasever/$basearch/
enabled=1
gpgcheck=0
注意:下一步 yum install libcurl 报错提示repo仓库 http://www.city-fan.org/ftp/contrib/yum-repo/ 不可用的话,自己搜索一下能用的仓库替换就好啦。
升级curl
yum clean all
yum install libcurl
编译升级到Tengine-2.2.3
获得宝塔Tengine的编译参数
nginx -V 结果如下:
[root@ggc ~]# nginx -V
Tengine version: Tengine/2.2.2 (nginx/1.8.1)
built by gcc 4.8.5 20150623 (Red Hat 4.8.5-28) (GCC)
TLS SNI support enabled
configure arguments: --user=www --group=www --prefix=/www/server/nginx --add-module=/www/server/nginx/src/ngx_devel_kit --add-module=/www/server/nginx/src/lua_nginx_module --add-module=/www/server/nginx/src/ngx_cache_purge --add-module=/www/server/nginx/src/nginx-sticky-module --with-http_stub_status_module --with-http_ssl_module --with-http_v2_module --with-http_image_filter_module --with-http_gzip_static_module --with-http_gunzip_module --with-ipv6 --with-http_sub_module --with-http_flv_module --with-http_addition_module --with-http_realip_module --with-http_mp4_module --with-http_concat_module --with-ld-opt=-Wl,-E --without-http_upstream_session_sticky_module --with-pcre=pcre-8.40
nginx: loaded modules:
nginx:     ngx_core_module (static)
nginx:     ngx_errlog_module (static)
nginx:     ngx_conf_module (static)
nginx:     ngx_dso_module (static)
......
可以看出他它的版本号和配置文件路径和添加的模块路径都在 /www/server 下, 其中 /www 是宝塔默认安装路径,server 则是宝塔存服务端和配置文件的路径,于是确定了这是宝塔的 nginx,将 configure arguments: 后面的参数复制下来,后面需要用到:
–user=www –group=www –prefix=/www/server/nginx –add-module=/www/server/nginx/src/ngx_devel_kit –add-module=/www/server/nginx/src/lua_nginx_module –add-module=/www/server/nginx/src/ngx_cache_purge –add-module=/www/server/nginx/src/nginx-sticky-module –with-http_stub_status_module –with-http_ssl_module –with-http_v2_module –with-http_image_filter_module –with-http_gzip_static_module –with-http_gunzip_module –with-ipv6 –with-http_sub_module –with-http_flv_module –with-http_addition_module –with-http_realip_module –with-http_mp4_module –with-http_concat_module –with-ld-opt=-Wl,-E –without-http_upstream_session_sticky_module –with-pcre=pcre-8.40
注意:红色部分的 --with-pcre=pcre-8.40 需要修改成你自己的路径,比如 --with-pcre=/www/server/nginx/src/pcre-8.40 ,和前面寻找OpenSSL目录一样,通过 find / -name 'pcre-8.40' 命令搜寻。
下载Tengine-2.2.3并编译
wget https://tengine.taobao.org/download/tengine-2.2.3.tar.gz
tar -xvf tengine-2.2.3.tar.gz
rm -f tengine-2.2.3.tar.gz
cd nginx-1.13.3
./configure --user=www --group=www --prefix=/www/server/nginx --add-module=/www/server/nginx/src/ngx_devel_kit --add-module=/www/server/nginx/src/lua_nginx_module --add-module=/www/server/nginx/src/ngx_cache_purge --add-module=/www/server/nginx/src/nginx-sticky-module --with-http_stub_status_module --with-http_ssl_module --with-http_v2_module --with-http_image_filter_module --with-http_gzip_static_module --with-http_gunzip_module --with-ipv6 --with-http_sub_module --with-http_flv_module --with-http_addition_module --with-http_realip_module --with-http_mp4_module --with-http_concat_module --with-ld-opt=-Wl,-E --without-http_upstream_session_sticky_module --with-pcre=/www/server/nginx/src/pcre-8.40
make
注意:其中 ./configure 后面那一串就是刚刚复制并修改过后的 configure arguments: 后面的参数 (请复制并修改你自己的那一段参数);运行 ./configure 之后可能会有 ipv6 的警告, 可以不用理会, make 命令可以换成 make -j 2 代表同时使用 2 线程编译, 根据自己 cpu 核数调节, 如果中途报错,按 ctrl+c 停止编译, 然后直接 make 编译。
寻找宝塔的Tengine所在位置并替换安装
需要注意, 不要直接 make install ,这样可能会覆盖一些配置文件, 先通过 find / -name nginx 查找当前服务器里名为 nginx 的文件或目录。
[root@ggc ~]# find / -name nginx
/usr/local/nginx
/usr/bin/nginx
/root/tengine-2.2.3/objs/nginx
/www/server/panel/vhost/nginx
/www/server/panel/rewrite/nginx
/www/server/nginx
/www/server/nginx/sbin/nginx
/www/server/nginx/src/objs/nginx
/etc/rc.d/init.d/nginx
可以看到在 /www/server 目录里有几个叫 nginx 的文件或目录, 其中最可疑的就是 /www/server/nginx/sbin/nginx ,直接执行 /www/server/nginx/sbin/nginx -V 可以看到 nginx 的版本和参数都和宝塔 Tengine 的一样,可以确定这就是宝塔的 Tengine.
在宝塔面板上将 Tengine 停止,确认停止后再使用 cp 命令将编译好的新版本覆盖掉宝塔的 nginx,否则可能会提示文件正在占用,覆盖前建议先把旧的Tengine给备份一下。
rm -f /www/server/nginx/sbin/nginx.old
mv /www/server/nginx/sbin/nginx /www/server/nginx/sbin/nginx.old
cp objs/nginx /www/server/nginx/sbin/nginx
替换成功后使用 nginx -V 命令可以看到 Tengine 已经成功升级到了2.2.3
[root@ggc ~]# nginx -V
Tengine version: Tengine/2.2.3 (nginx/1.8.1)
built by gcc 4.8.5 20150623 (Red Hat 4.8.5-28) (GCC)
TLS SNI support enabled
configure arguments: --user=www --group=www --prefix=/www/server/nginx --add-module=/www/server/nginx/src/ngx_devel_kit --add-module=/www/server/nginx/src/lua_nginx_module --add-module=/www/server/nginx/src/ngx_cache_purge --add-module=/www/server/nginx/src/nginx-sticky-module --with-http_stub_status_module --with-http_ssl_module --with-http_v2_module --with-http_image_filter_module --with-http_gzip_static_module --with-http_gunzip_module --with-ipv6 --with-http_sub_module --with-http_flv_module --with-http_addition_module --with-http_realip_module --with-http_mp4_module --with-http_concat_module --with-ld-opt=-Wl,-E --without-http_upstream_session_sticky_module --with-pcre=/www/server/nginx/src/pcre-8.40
nginx: loaded modules:
nginx:     ngx_core_module (static)
nginx:     ngx_errlog_module (static)
nginx:     ngx_conf_module (static)
nginx:     ngx_dso_module (static)
......
在宝塔面板上重新开启 Tengine ,启动成功就好啦。
开启TLSv1.3并关闭TLSv1.0
如图所示,打开宝塔面板的站点设置选型卡,在 ssl_protocols 后面加 TLSv1.3 ,可以选择删除 TLSv1(图中已删除),因为 TLSv1.0 不符合 PCI DSS 规范。然后将 ssl_ciphers 后面修改为:TLS13-AES-256-GCM-SHA384:TLS13-CHACHA20-POLY1305-SHA256:TLS13-AES-128-GCM-SHA256:EECDH+CHACHA20:EECDH+CHACHA20-draft:EECDH+ECDSA+AES128:EECDH+aRSA+AES128:RSA+AES128:EECDH+ECDSA+AES256:EECDH+aRSA+AES256:RSA+AES256:EECDH+ECDSA+3DES:EECDH+aRSA+3DES:RSA+3DES:!MD5;
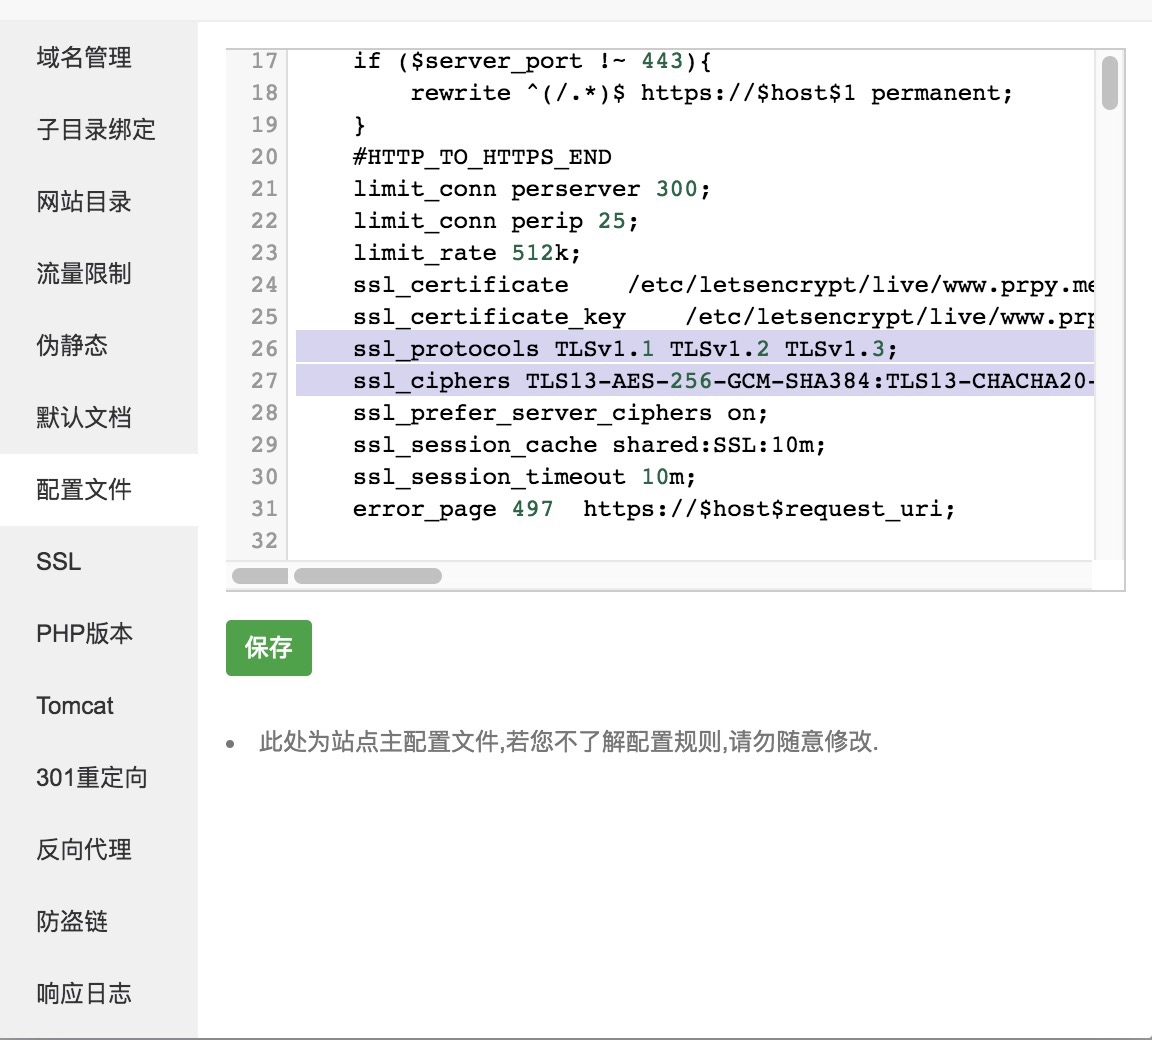
保存成功过后,使用 https://myssl.com 就可以查看 TLSv1.3 是否配置成功以及其他的SSL信息了喵。
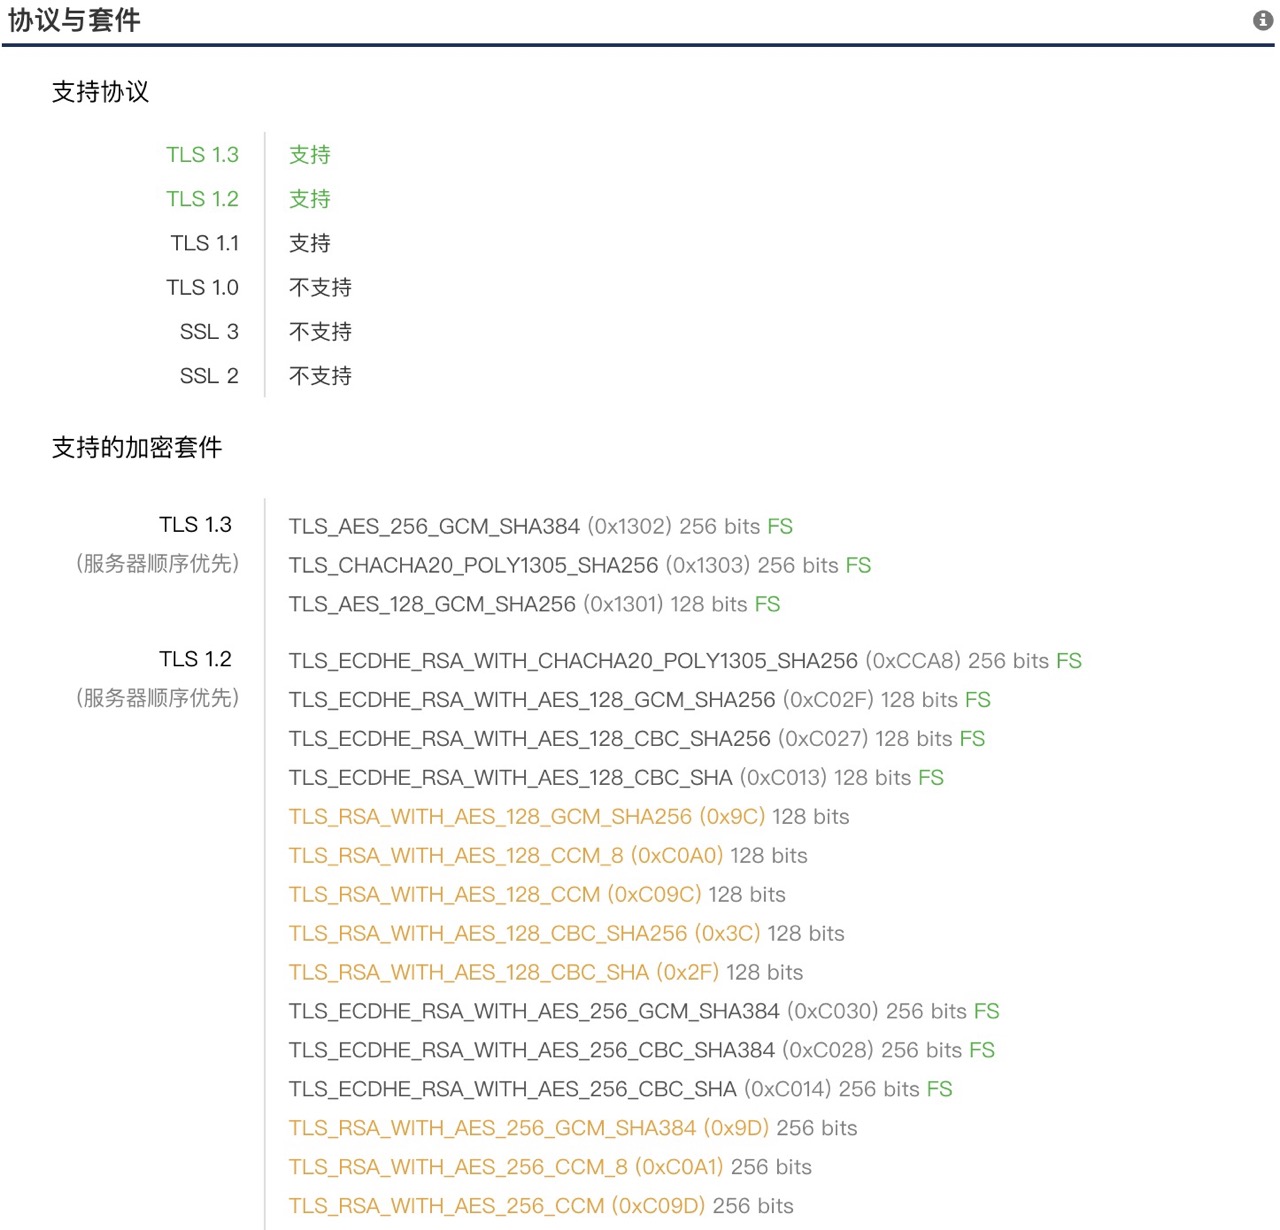
注意:同一台服务器下所有站点设置里面的 TLSv1.3 需要全部都配置上,不能单独只设置一个站点,同理,要关闭 TLSv1.0 也需要同时修改所有站点的站点设置里面的 ssl_protocols 参数,原因如下:
ssl_protocols 这个指令只在默认 server 中生效,在同一个 IP 的其他 server 块并不生效,比如有这样的需求:两个域名一个开启 TLSv1.3,另一个不开启 TLSv1.3,目前开源 tengine 和 nginx 是做不到的。*关于 TLSv1.3 的更多详细信息*
从这可以看到,这点也有其他人踩坑:宝塔nginx关闭不了tlsv1.0 (我不管,反正我最开始就没注意到qwq,弄了半天没找到问题。
参考文章:
· 使用宝塔面板开启TLSv1.3 by resdon
· 宝塔手动升级Nginx,开启TLS1.3 final by Sagit
· 将宝塔面板的 nginx 升级到 1.13.3 by shirakun
· 宝塔面板手动升级Nginx为1.15.3 by Bug 侠
· nginx 安全问题致使 1400 多万台服务器易遭受 DoS 攻击by hardbone
· Nginx HTTP/2和mp4模块拒绝服务预警 by 360-CERT
· Tengine-2.2.3 发布,修复 HTTP/2 和 MP4 模块安全 by OSC_vYkLcq
· 宝塔更新建议为啥没人重视 by 宝塔官方团队
· Tengine TLSv1.3最佳实践 by 金九
· 建议率先支持tls1.3协议 by laoda